WiPay WooCommerce Credit Card Plugin
Please note this plugin requires your website to have WooCommerce installed and configured on your WordPress website.
However, the currency is limited to the platform selected.
- This plugin allows you to select the currency for your website by configuring the plugin to match the currency set on the WooCommerce Plugin.
- Trinidad and Tobago platform: USD, TTD
- Jamaica platform: USD, JMD
- Barbados platform: USD, (BBD-Coming Soon)
- Guyana platform: Coming Soon
- St Lucia platform: Coming Soon
- This plugin allows you to customize the Orders’ status upon successful payment. You have the choice of ‘processed’ or ‘completed’.
- This plugin allows you to chose your fee structure. This allows you to decide how the WiPay fees are paid:
- By the user (Merchant Absorb)
- By the Customer (Customer Pay)
- By both user and customer (50/50 split)
- This plugin also allows you to select whether or not the fee structure is displayed and is directly linked to your WiPay Account.
- This plugin allows for improved Transaction recovery. You can now resolve occurrences where your Customer was charged, but your WiPay Dashboard and/or your WooCommerce Order status do not indicate a successful payment. Use `Manual Verify` to update your WooCommerce Order to the correct status.
- The image of the VISA card and Mastercard can also be toggled to the your preference.
- The plugin allows you to test the plugin using the ‘SandBox Mode’. This comes complete with a pre-populated account number and API key.
- The plugin also allows you to log errors as it occurs with the ‘Enable Logging’ feature.
- Click the link below to download the WiPay WooCommerce Plugin
NB: Pay attention to where the file is saved after downloads
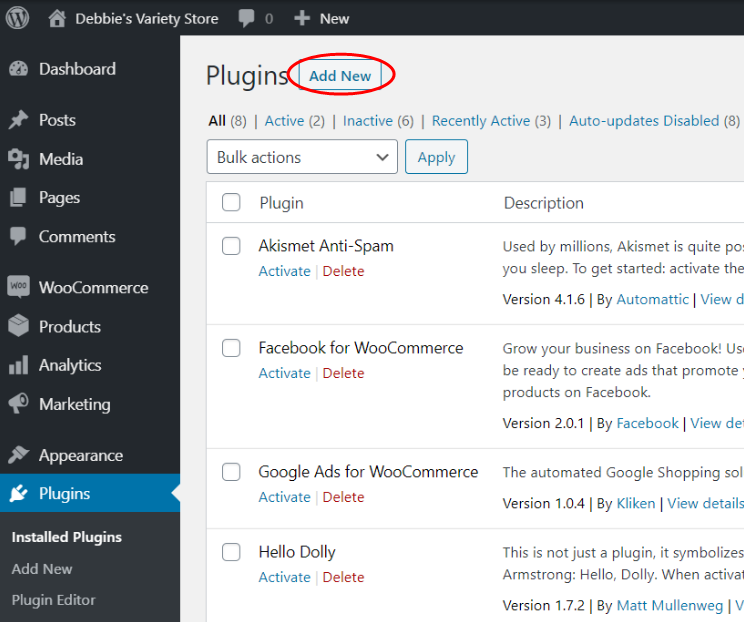
- On your WordPress Site, select Plugins and click ‘Add New’
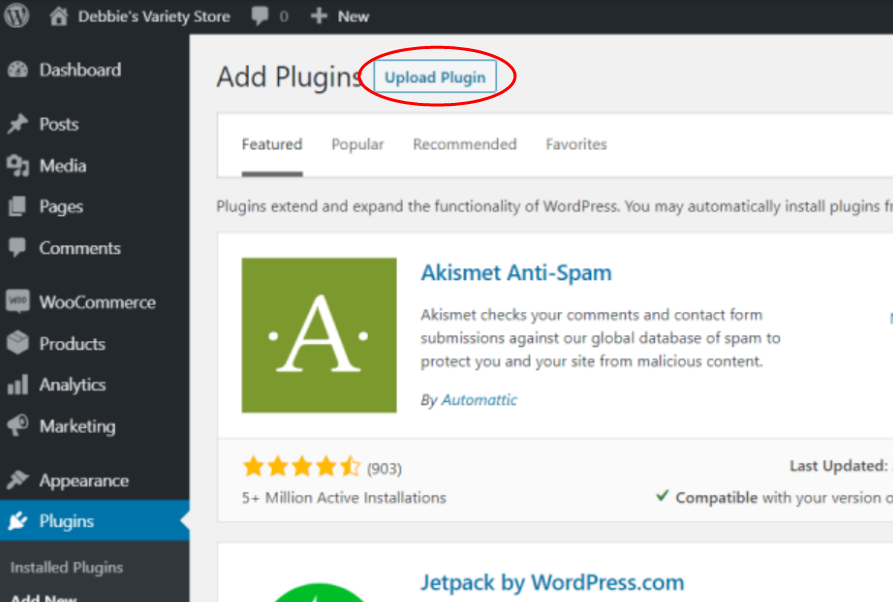
- On the Add Plugins Page, click “Upload Plugins” then “Choose Files”.
- Navigate to where WiPay WooCommerce Plugin was saved on your device and click “Install Now”

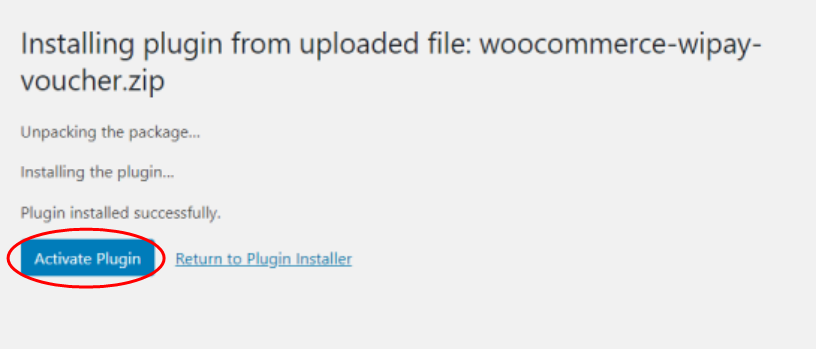
- Once Installed, you will get a display similar to this. Then click “Activate Plugin”. You will get a notification, once the plugin is activated.
Once your plugin is Activated, you must set up the plugin on your website.
Please note, that the currencies supported are different for each platform
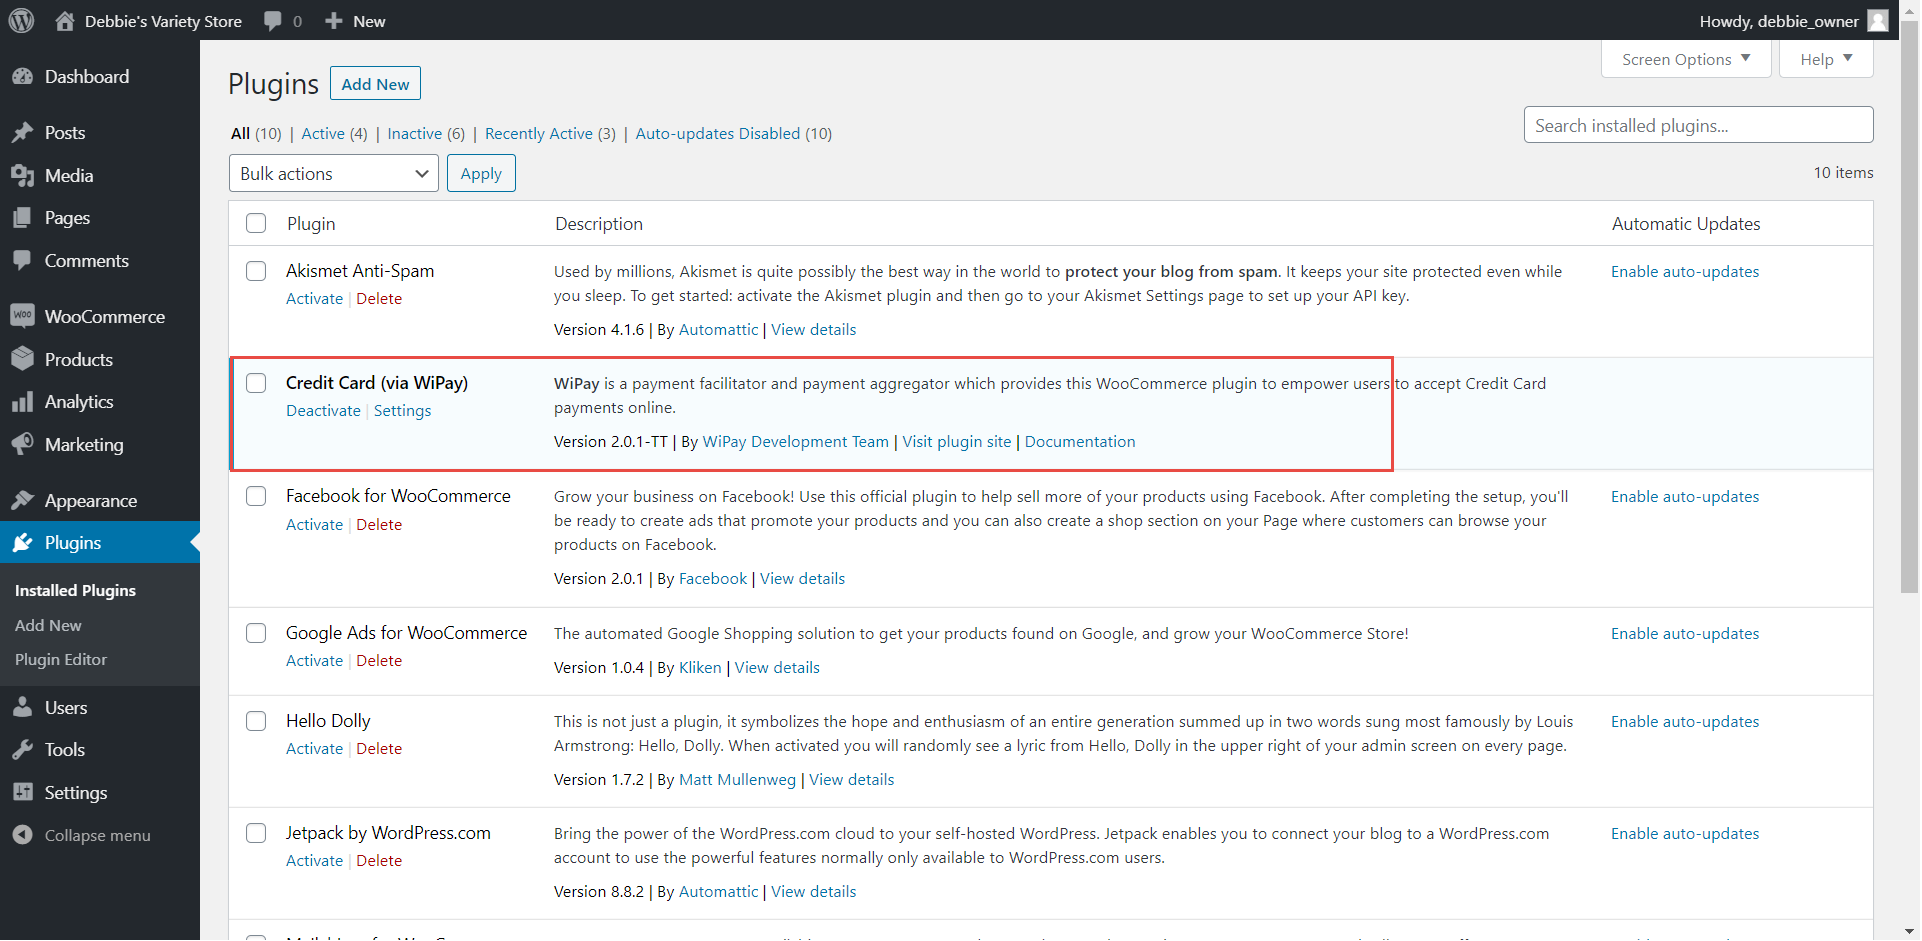
- Locate the plugin on your plugin manager page.
- Click ‘Update Plugin’ at the top right-hand corner of the page
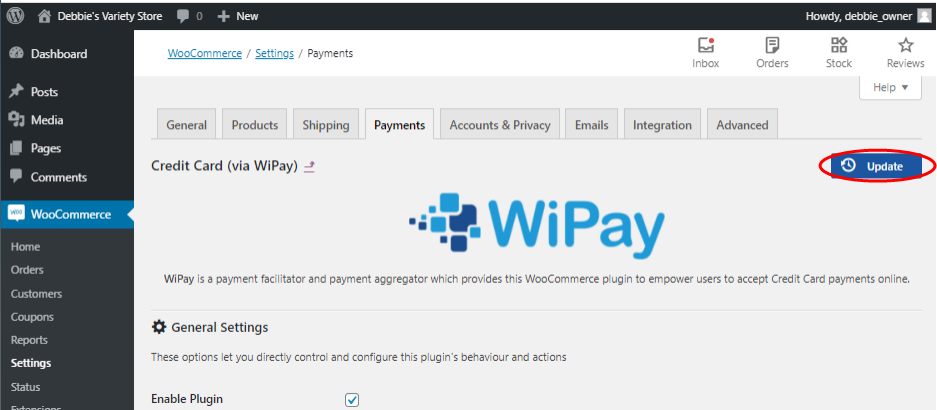
- Ensure that the following is checked
a. Enable Plugin
b. AutoCompleteNB: If you wish to push this plugin to LIVE, uncheck “SandBox Mode”
Choose the “Fee Structure” and “Image Size” you desire. -
Ensure you select the platform for your respective country.

Please note, that the currencies supported are different for each platform
- TT platform supports USD and TTD
- JMD platform supports USD and JMD
- BBD platform supports USD only
-
For the currency setting, you will need to select your preferred currency in your WooCommerce
settings. -
You will also have to configure the following:
- Fee Structure
- Fee Structure Display
- Image Size
-
If you chose to uncheck “SandBox Mode”, you will be required to fill out the ‘LIVE Credentials’. A
prompt is given when the account number and API key is accepted.
a. WiPay Account Number
b. WiPay Business Key
If you need assistance locating your WiPay API key, click here.
-
If you chose to leave “SandBox Mode” checked for testing purposes, you can use the credentials
provided on the plugin manager.
-
If you wish to log the information that this plugin process, check ‘Enable Logging’

The ‘Download’ button allows you to download the logs where as the ‘Clear’ button erases all
data saved on the file. -
Click “Save Changes” and a notification will appear to state that changes have been saved.
- At checkout, your customers will see the option to pay by credit card and the fee structure you selected will be shown.

To uninstall the WiPay WooCommerce Plugin
- Navigate to the Plugin page and locate “Credit Card (via WiPay)”
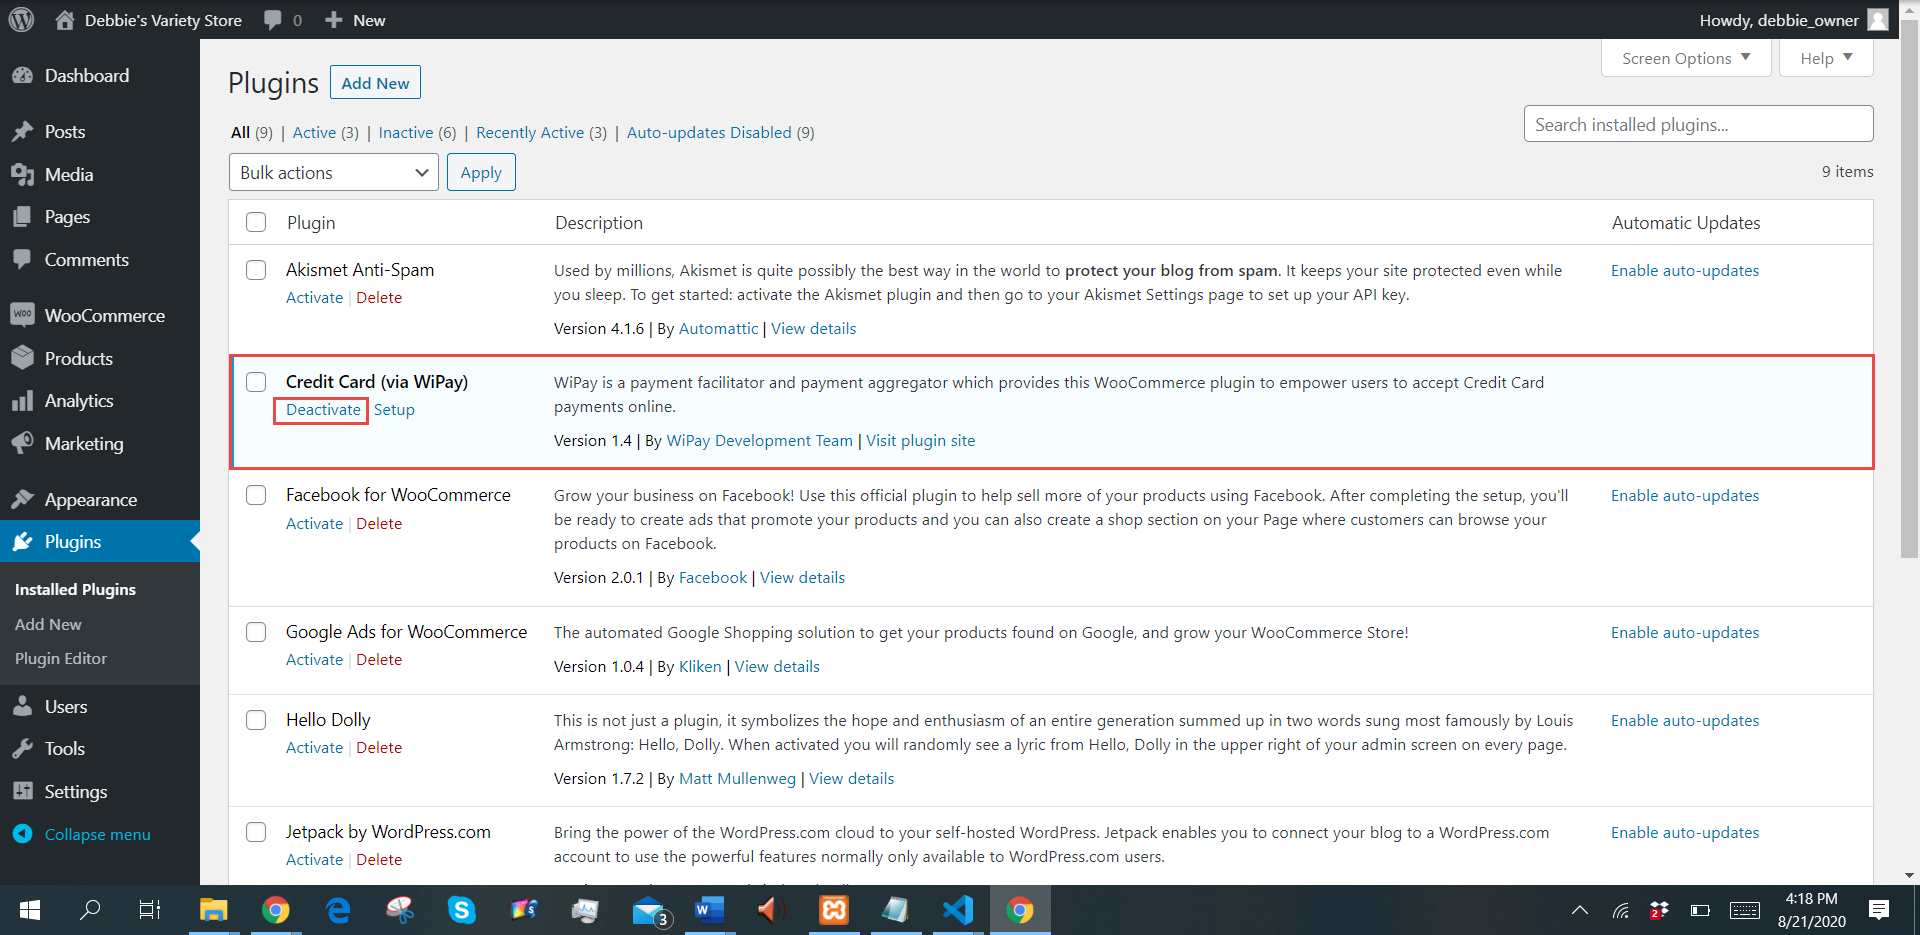
- Click ‘Deactivate’ then ‘Delete’

This plugin allows the user to log event data. This allows the user to:
- Obtain a log of events that occur with relations to the plugin
- Provide a log to WiPay Customer Service
You will need to perform the following sets to provide the CS team with information to assist with your issue:
- Go to Plugins Manager -> Credit Card (via WiPay) -> Settings, then check “Enable Logging”.
- Click “Clear” to erase all previous data on the log file.
- Repeat the steps you took previously to encounter the error.
- Return to the settings page and click Download.
- Email the log file to WiPay Customer Service to [email protected], with a thorough description of the error you are encountering.
ISSUE: There is an error “WiPay Account is not authorized to receive USD payment“. For example, as seen at Checkout:
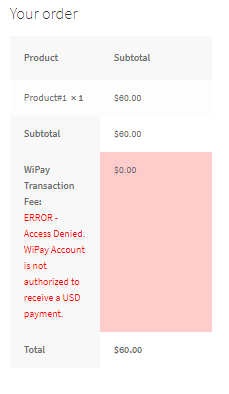
Solution: Contact WiPay Customer Service and request permission to accept US payments.
ISSUE: Changing WooCommerce Currency to reflect my Platform Currency.
Solution: Follow the outlined steps to change the currency:
- Go to Plugins Manager -> Credit Card (via WiPay) -> Settings.
- Click on the Change button:

- Under Currency options, change the Currency to the required currency:
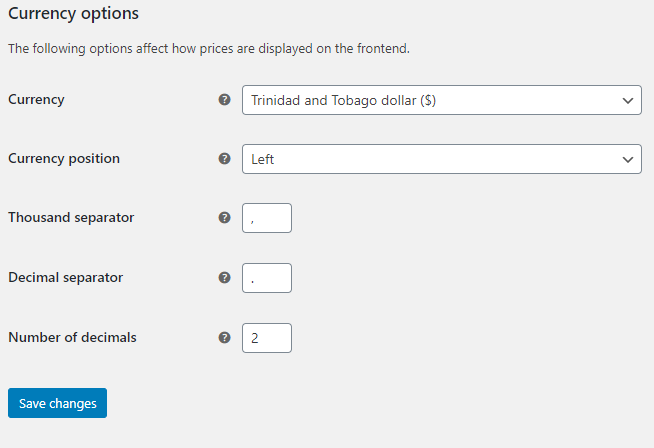
- Click Save Changes. Don’t forget to return to the Plugins Settings and finish setting up your plugin.
ISSUE: Locating the WiPay API credentials.
Solution: Follow the outlined steps to obtain your WiPay API credentials:
- Go to your WiPay Account Dashboard and Log-In using your registered email and password.
- At the top-right, select the drop-down menu and go to the Developer section.
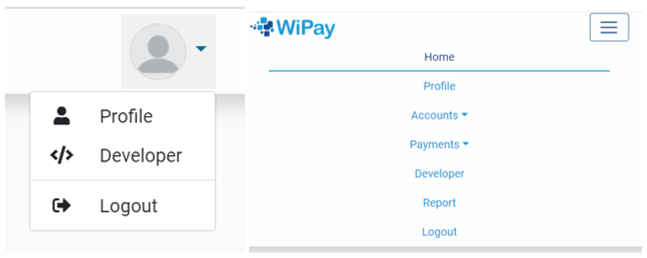
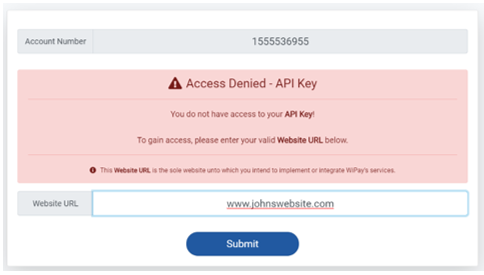
- If you have not registered your website, you will need to enter your website URL and then click ‘Submit’.
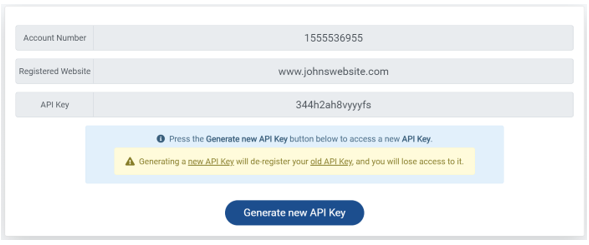
- If you have registered your website, then your API key will be available to copy and paste.
- Alternatively, you can choose to generate a new API by clicking Generate new API Key.
ISSUE: The WooCommerce Order has Status Failed, and has no Transaction Details.
Solution: Follow the outlined steps to Manually Verify the Status of the WooCommerce Order:
- Go to your WooCommerce Orders table by navigating to WooCommerce -> Orders.
- In the table, click on the Eye icon:

- A popup will appear with the Manual Verify button, click it.
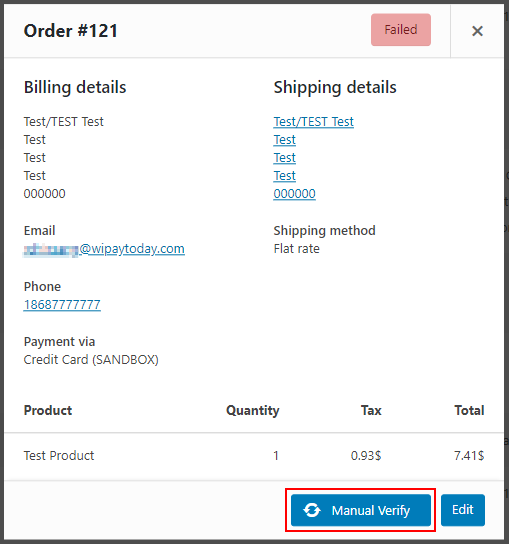
- Wait for the process to complete, and you should see a properly completed Order, with a correct message in the Transaction Details column. For example;
[1-R1]: Transaction is approved. for a normal approved transaction, or
[2-R2]: Transaction is declined. for a normal declined transaction. (Note: other responses are possible!)
The Status of the WooCommerce Order should also reflect either Failed, or Processing or Completed (based on your plugin settings).
- “WiPay Transaction not found. Please revise the submitted transaction id.”
This occurs when the system was unable to find the transaction.
- “Unexpected WiPay server error. Please try again later.”
This occurs when there is an unexpected error, and the web page requires the information to be resubmitted.
- “Client Error”
This occurs when webpage is redirected.
2.1.0 (July 2022)
- Merchants can now enforce `Advanced Security` at Checkout (LIVE environment ONLY)
- Revised and improved the `Hash` check verification for payments
- Updated the Transaction Response layout for better visibility and theme consistency.
- Added the ability to `disable` showing the WiPay Transaction Fee at checkout.
- Updated the Settings Page UI
2.0.4 (March 2021)
- Fixed bug where no additional costs were ever being added to the Cash on Delivery (and possibly other) payment options.
2.0.3 (January 2021)
- Fixed bug when using the Manual Verify feature on the Edit Item Order page.
- Fixed bug where the Credit Card (via WiPay) Fee was being added to other payment methods at Checkout.
2.0.2 (October 2020)
- Revised how the Total at Checkout (before fees are applied) is calculated
- Revised how the Total is sent to the WiPay API (after the Checkout stage)
- Fixed the off-by-1(cent) rounding that occurs in native WC at Checkout
- Added complete plugin version number in the header of the plugin’s Settings page
- Plugin now supports both PHP 5.6+ and PHP 7.1+
2.0.1 (July 2020)
- Updated how the total at checkout (before fees are applied) is calculated
- Updated logic to double-check the total (without fees) to be sent to the WiPay API (after the checkout stage)
- Patched ‘hash’ mismatch error behavior (temporary)
2.0.0 (May 2020)
- Update how the plugin handles currency:
- Removed automatic currency conversion from `USD` to `TTD`, if the WooCommerce store is configured with `USD` as the primary currency.
(Revert from `v1.1#2`) - Uses the configured WooCommerce currency for it’s operation.
- Streamlined changing the currency in WooCommerce, from the plugin.
- Removed automatic currency conversion from `USD` to `TTD`, if the WooCommerce store is configured with `USD` as the primary currency.
- Updated logo and logo logic:
- Revised the logo images, and sizes (height-emphasized; `128px – Large`, `64px – Medium` and `32px – Small`).
- Added logo image preview built-in into the settings interface.
- The logo image at checkout will display under the Checkout option text, at `Medium` and `Large` sizes.
- The logo image at checkout will display in-line to the Checkout option text, at `Small` size.
- Made “Small” version the default size of the logo simage.
- Fixed (properly) the plugin not linking to the images correctly on fresh installs.
- Updated Plugin URI; `wipaytoday` to `wipaycaribbean`.
- Fixed conflict with WordPress security plugin `iTheme Security`, in the normal WiPay API processing.
- Changed versioning convention, to now use standardized Sementic Versioning. Enforced from this version onwards.
- Updated the README:
- Added dates to the versions
- Formatting revisions
- Fixed typos.
- Changed terminology `business_key` -> `api_key` platform-wide (Revert from `v1.2#4`)
1.4 (March 2020)
- Fixed the plugin not linking to the images correctly on fresh installs
- Added new image size selector to allow the end user to configure how big they want the image at checkout to be (of the four pre-defined image sizes)
1.3 (December 2019)
- Added new option to auto-complete the order upon successful payment
- Added new feature that will show an Order Status of `Failed` if the payment was unsuccessful
- Based on SandBox mode, or LIVE mode, the Credit Card option will now show `Credit Card (SANDBOX)` or `Credit Card` respectively
- Updated the plugin url to be based on the folder (install) name
1.2 (November 2019)
- Updated Plugin Name, URI, Description, Version, Author and Author Description
- Updated Plugin form fields (plugin settings)
- Reformatted source code
- Removed old terminologies:
- `seller_id`, `developer_id` -> `account_number`
- `api_key` -> `business_key` (See `v2.0.0#9`)
- Added option to choose a method to handle Transaction Fees; Customer Pays, 50/50 Split, Merchant Absorbs
- Transaction Fees now shows up at the Checkout page
- Transaction IDs are now shown after payment on the Thank You page
- Transaction IDs are now shown in the Admin Panel
- Note: Transaction IDs for SandBox payments are prefixed with `SB_`
- Revised README with updated information
1.1 (November 2018)
- Fix critical error with previous versions of WooCommerce
- Support automatic currency conversion from `USD` to `TTD`, if the WooCommerce store is configured with USD as the primary currency. (See `v2.0.0#1`)
- Changed name from `WiPay Credit Card` to `Credit Card`
1.0 (August 2018)
- Initial release
