WiPay Magento Credit Card and Voucher Plugin
Please note, the WiPay Magento Credit Card and Voucher Plugin is to be used on a website built on the Magento Platform.
This is version 1.1 of WiPay Magento Credit Card and Voucher Plugin.
The change log can be found (here-Coming Soon).
- Allows customers to pay using either vouchers or credit card on your Magento Site
- Provides facilitates for the unbanked and underbanked via Vouchers
- Provides facilitates for credit card payments in a secure WiPay Portal
- WiPay’s secure distributed ledger system permanently captures the details of every WiPay payment transaction.
The Magento Credit Card and Voucher Plugin can be installed using the following steps.
-
Click the link below to download the WiPay Magento Credit Card and Voucher Plugin.
This plugin downloads as a zipped file.
NB: Pay attention to where the downloaded plugin is saved.
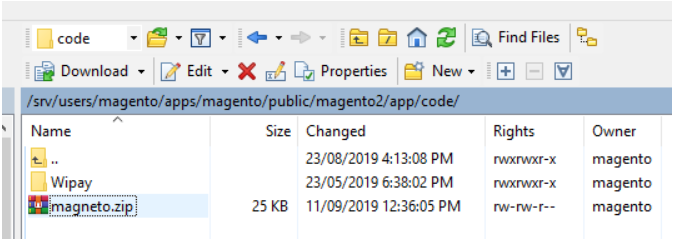
- Transfer the downloaded file to ‘{Magento root directory}/app/code’ directory

- Extract the files within the zipped folder.
- Open the terminal console and navigate to Magento root directory.
-
Run the following commands
- php bin/magento setup:di:compile
- php bin/magento setup:upgrade
- php bin/magento setup:static-content:deploy -f
- php bin/magento indexer:reindex
- php bin/magento cache:flush

Now that the plugin is installed, the WiPay Magento Credit Card and Voucher Plugin needs to be configured.
01. On the Admin Panel, go to Store > Settings > Configuration > Sales > Payment Methods
02. Enter information as needed for ‘WiPay Credit’ and ‘WiPay Voucher’
a. The ‘Developer ID’ refers to the Account number
b. The ‘Merchant Key’ refers to the ‘WiPay API Key’
03. How to set up the currency of your preference?
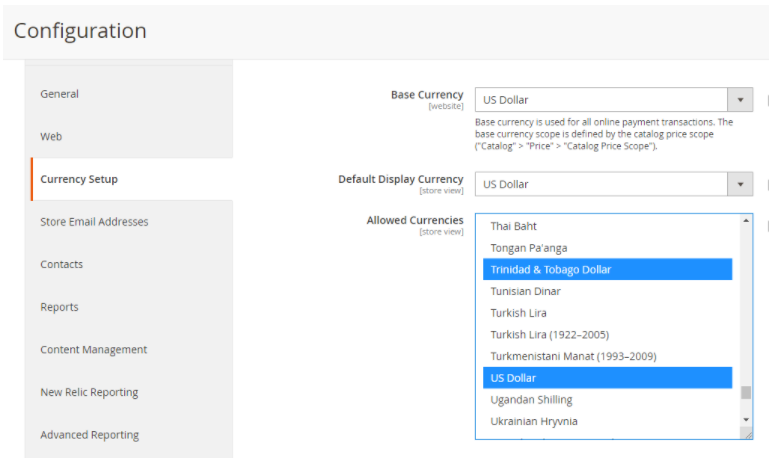
a. Go to Stores > Settings > Configuration
b. On the left panel, under General, select Currency Setup.
c. Under the Currency Options Section, look for Allow Currencies list and select the currency of your choice.

Currently, WiPay supports USD, TTD and JMD.
NB: Hold down ‘Ctrl’ Key to select multiple options.
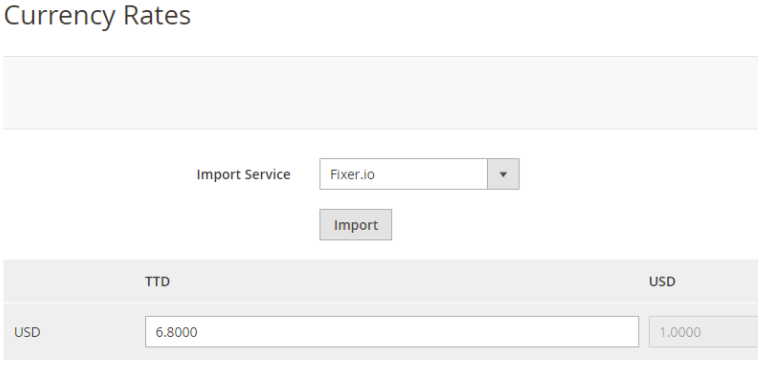
d. On the Admin Panel, go to Stores > Currency > Currency Rates
e. Enter the exchange rates between the currency of choice and USD currency

f. Click ‘Save’
NB: The merchant is responsible for changing the value of the exchange rate which is used to calculate the total to be paid.
More content coming soon
Question: When running the commands during installation, why do I get a memory limit error?
Solution: To get past a memory limit error, run the commands with:
php -d memory_limit=-1 bin/magento setup:di:compile
php -d memory_limit=-1 bin/magento setup:upgrade
php -d memory_limit=-1 bin/magento setup:static-content:deploy -f
php -d memory_limit=-1 bin/magento indexer:reindex
php -d memory_limit=-1 bin/magento cache:flush
Question: After installation, the payment methods do not show up on the admin panel?
Solution: You may have to enable the module.
After installation, the status of the wipay credit card and voucher modules can be checked using the following commands:
php bin/magento module:status Wipay_Credit
php bin/magento module:status Wipay_Voucher
The modules can be disabled using the following commands:
php bin/magento module:disable Wipay_Credit
php bin/magento module:disable Wipay_Voucher
The modules can be enabled using the following commands:
php bin/magento module:enable Wipay_Credit
php bin/magento module:enable Wipay_Voucher
If the above commands did not work try clearing the cache. On the Magento admin panel, go to System > Tools > Cache Management and click the ‘Flush Magento Cache’ button.
Question: How to change order state and/or status?
Solution:
- A successful payment results in a “Processing” order state and “Processing” order status. An unsuccessful payment results in a “Canceled” order state and “Canceled” order status.
- To view orders and their states go to Sales > Orders on the admin panel. On this page you can click Action > View to see the details of any order.
- When viewing the details of any order you can change the state by clicking any one of the following buttons:
- Edit: the current order will be canceled and duplicated into a new one
- Cancel: delete order
- Send email: send an email with order details to customers
- Hold: change order state to On Hold
- Invoice: change order state to Processing
- Ship: change order state to Complete (after submitting shipment)
- Reorder: resubmit the same order
Note: These options change the order state and each state can be assigned by multiple statuses (you may add custom order statuses). For example, for Pending state, you can create two statuses: SM Pending and SH Pending, so you can change the status for this order into either SM Pending or SH Pending under “Notes” for any Order. (Note that the state of this order is still Pending).
Question: How do I perform cache management on my website?
Solution: Go to System > Tools > Cache Management.
Ensure the status of each cache type is enabled, if not select it by clicking the checkbox.
Select the refresh option and hit submit.
